Create Vector Datasets
This doc contains general instructions for the creation of the vector data sets required by ScrollStats.
An example dataset of a bend from the Lower Brazos River, Texas, is included in this doc to provide a visual aid to the user when creating datasets for their own bend.
ScrollStats uses the following vector datasets for a bend in order to calculate ridge metrics:
Channel Centerline (LineString):
Created manually from interpretation of the DEM
The channel centerline polyline should not intersect the bend boundary polygon and should extend past the bend boundary by 1-2 channel widths.
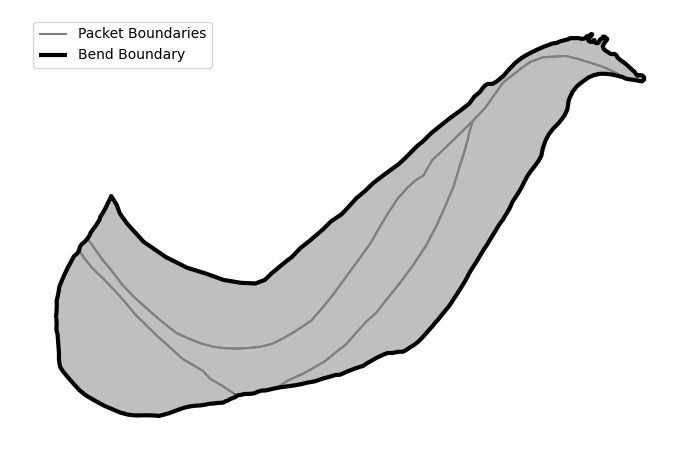
Bend Boundary (Polygon):
Created manually from interpretation of the DEM
The bend boundary encompasses the raised platform of ridge and swale topography between the active channel and the relatively smooth ancestral floodplain.
Each bend boundary should have a corresponding
bend_idthat can be used to relate other datasets to this bend. For example, thebend_idfor the 25th bend on the Lower Brazos River isLBR_025.
Packet Boundaries (Polygon):
Created manually from interpretation of the DEM
Packet boundaries are polygons that fit within and entirely cover the bend boundary polygon. Packet boundaries encompass groups of ridges with similar trajectories.
Packet boundaries should have a
bend_idcolumn as well as apacket_idcolumn.bend_idcan be used as a foreign key to relate the packets to their bend and the simplepacket_id(ex.p_01) can be used to differentiate the packets within each bend. There is no guarantee of an inherent order with packets, but in general, they can and should be numbered incrementally from the most ancestral to the most recent.
Ridges (LineString):
Created manually from interpretation of the DEM
Ridges are created for each ridge on the bend. Ridge polylines can be created before the ridge area classification process, however it is recommended that the ridge area rasters be used to help inform the creation of ridge polylines.
Ridge polylines should have a
bend_idcolumn, aridge_idcolumn, and optionally apacket_idcolumn if packets are used. Thebend_idand optionalpacket_idcolumns can be used as foreign keys to relate ridges to the larger morphological features and the simpleridge_id(ex.r_001) can be used to differentiate ridges within a bend. To a greater degree than the packets, there is no guarantee of an inherent order to the ridges on a given bend. However, as seen below, ridges often can, but are not guaranteed to, be ordered within packets.
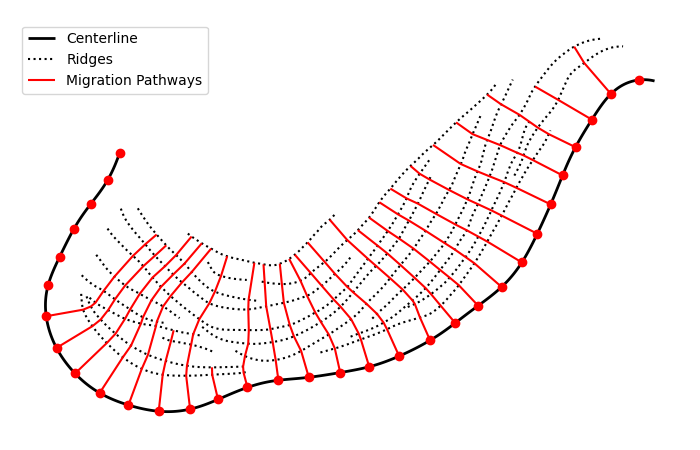
Migration Pathways (LineString):
Generated programmatically using
create_transects()Migration pathways are programmatically generated from the channel centerline and a set of ridges. The user specifies a set of starting points along the centerline from which the migration pathways will be generated. The migration pathway algorithm will then “walk” up the flood plain until it fails to intersect any more ridges.
The resulting migration pathways represent the varied paths of migration along a bend according to the depositional record contained in the ridge and swale topography.
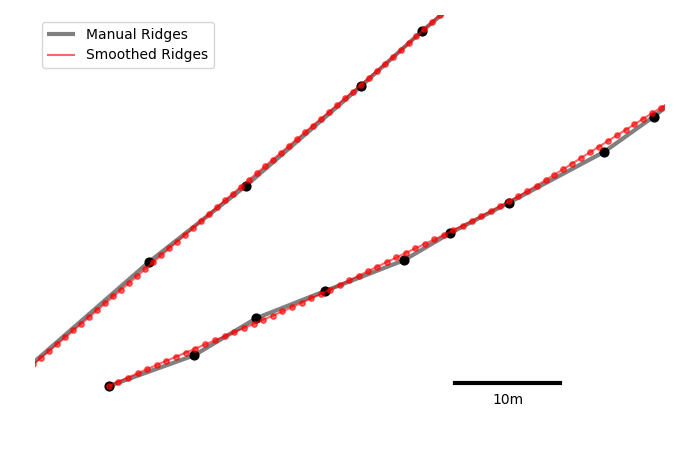
Note on point density for channel centerline and ridge lines
The migration pathway algorithm requires a high vertex density and high degree of “smoothness” for the input channel centerline and ridge line datasets. It is recommended that you focus on capturing the overall form of these linear features and not worry about point density when digitizing. The coarse polylines can be densified and smoothed with the included LineSmoother class.
While all of these above datasets are used, not all are strictly necessary, not all are required at the beginning of the workflow, and some are generated from ScrollStats.
The details of use for each of these datasets are summarized below:
Required for Raster Processing:
Bend Boundary: the bend boundary is a required to clip the ridge and swale topography from the DEM
Required for Migration Pathway Creation
Channel Centerline: channel centerline vertices serve as the starting point for all migration pathways
Ridges: the migration pathway trajectories are calculated using the location and curvature of digitized ridge lines
Used for Ridge Metric Calculation
Migration Pathways: migration pathways are a series of transects that trace the supposed path of channel migration from the channel centerline. They are used to sample both the DEM and ridge area raster to calculate ridge width, amplitude, and spacing for every intersection of the migration pathways and ridge lines.
Packet Boundaries (optional): depositional packet boundaries contain groups of ridges with similar trajectories which allows the user to aggregate ridge metrics within these packets in order to investigate the morphologic changes resulting from changes in the hydrologic regime of the river.
Create Bend Boundaries
Use a desktop GIS software (QGIS, ArcGIS Pro, etc.) to manually delineate bend and packet boundaries.
Example bend and packet boundaries can be found in the example_data directory included with ScrollStats. These boundaries are mapped below.
from __future__ import annotations

from pathlib import Path

import geopandas as gpd
import matplotlib.pyplot as plt
import numpy as np
from shapely.geometry import MultiPoint

from scrollstats import LineSmoother, create_transects

# User defined parameters
# LineSmoother
SMOOTHING_WINDOW_SIZE = 5  # Measured in vertices
VERTEX_SPACING = 1  # Distance between densified vertices; Measured in linear unit of dataset (meters for example datasets)

# Migration Pathway
SHOOT_DISTANCE = 300  # Distance that the N1 coordinate will shoot out from point P1; measured in linear unit of dataset
SEARCH_DISTANCE = 200  # Buffer radius used to search for an N2 coordinate on R2; measured in linear unit of dataset
DEV_FROM_90 = 5  # Max angular deviation from 90° allowed when searching for an N2 coordinate on R2; measured in degrees

output_dir = Path("example_data/output")
if not output_dir.exists():
    output_dir.mkdir(parents=True)
bend_area = gpd.read_file("example_data/input/LBR_025_bend.geojson").set_index(
    "bend_id"
)
packets = gpd.read_file("example_data/input/LBR_025_packets.geojson").set_index(
    "packet_id"
)

fig, ax = plt.subplots(1, 1, figsize=(7, 4.5))

packets.boundary.plot(color="grey", ax=ax, label="Packet Boundaries")
packets.plot(color="grey", alpha=0.5, ax=ax)
bend_area.boundary.plot(color="k", lw=3, ax=ax, label="Bend Boundary")

ax.legend(loc="upper left")
ax.set_axis_off()

plt.tight_layout()
Create Channel Centerline and Ridge Lines
After the ridge area rasters are created using the bend boundary above, manually create the ridge lines and channel centerline.
Example centerline and ridge lines can be found in the example_data directory included with ScrollStats. The centerline and ridge lines are mapped below.
ridge_path = Path("example_data/input/LBR_025_ridges_manual.geojson")
manual_ridges = gpd.read_file(ridge_path)

# Centerline is already smoothed and densified
cl_path = Path("example_data/input/LBR_025_cl.geojson")
cl = gpd.read_file(cl_path)

# Plot
fig, ax = plt.subplots(1, 1, figsize=(7, 4.5))

manual_ridges.plot(color="k", ls=":", ax=ax, label="Ridges (Manual)")
cl.plot(color="k", lw=2, ax=ax, label="Centerline")

ax.legend(loc="upper left")
ax.set_axis_off()

plt.tight_layout()

Line Smoothing
Apply LineSmoother to smooth and densify the lines
# Smooth and densify the lines
ls = LineSmoother(manual_ridges, VERTEX_SPACING, SMOOTHING_WINDOW_SIZE)
smooth_ridges = ls.execute()

# Save smooth ridges to disk
smooth_ridge_name = ridge_path.with_stem(ridge_path.stem + "_smoothed").name
smooth_ridge_path = output_dir / smooth_ridge_name

smooth_ridges.to_file(smooth_ridge_path, driver="GeoJSON", index=False)

# Plot manual and smoothed ridges
fig, ax = plt.subplots(1, 1, figsize=(7, 4.5))
ax.set_aspect("equal")

manual_ridges_points = manual_ridges.geometry.apply(lambda x: MultiPoint(x.coords))
smooth_ridges_points = smooth_ridges.geometry.apply(lambda x: MultiPoint(x.coords))

manual_ridges.plot(ax=ax, color="grey", lw=3, zorder=1, label="Manual Ridges")
manual_ridges_points.plot(ax=ax, color="black", markersize=40, zorder=2)
smooth_ridges.plot(
    ax=ax, color="red", lw=1.5, alpha=0.6, zorder=3, label="Smoothed Ridges"
)
smooth_ridges_points.plot(ax=ax, color="red", markersize=15, alpha=0.6, zorder=4)

# scalebar
x_sb = 1067860
y_sb = 3111455
len_sb = 10
ax.plot((x_sb, x_sb + len_sb), (y_sb, y_sb), lw=3, color="black")
ax.text(x=x_sb + len_sb / 2, y=y_sb - 2, s=f"{len_sb}m", horizontalalignment="center")

ax.set_ylim(3111450, 3111490)
ax.set_xlim(1067820, 1067880)
ax.legend(loc="upper left")
ax.set_axis_off()

plt.tight_layout()
Create Migration Pathways
Now that the ridges and centerlines are created, we can create the migration pathways.
A migration pathway can be created from any point along the centerline. Below we will create an array of starting points each roughly a channel-width apart (~100m for the Lower Brazos).
You can also create a set number of starting points by defining your step
distance as the channel length divided by the number of evenly spaced transects.
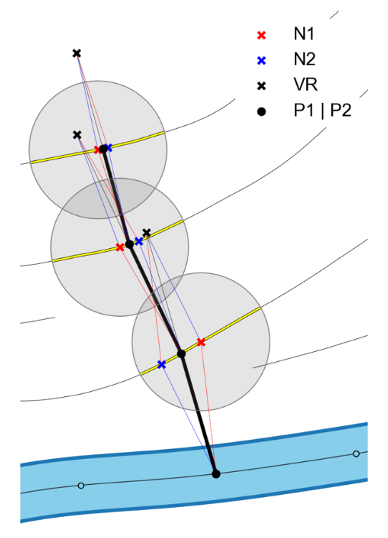
Migration Pathway Algorithm
Our process involves ten major steps as follows:
Let the channel centerline be called R1
Select a starting point on R1, let this point be called P1
From P1, shoot a given distance perpendicular from R1 in the direction of the convex bank.
If the line intersects a ridge line, call this ridge R2 and proceed to step 5. If not, move on to the next location on R1 and repeat step 2.
Where this new line intersects R2, make a new point and call it N1
Buffer N1 by a given radius and search all vertices of R2 that intersect this buffer for a point from which a line may be drawn back to P1 that is perpendicular to R2. Call this new point on R2, N2.
Treating the lines P1->N1 and P1->N2 as vectors, calculate their vertical resultant and place a new point at the end of this vertical resultant. Let this point be called VR.
Where the line P1->VR intersects R2, place a point and let this point be called P2. Line P1->P2 is the migration pathway for this location on the floodplain.
Redefine P2 as P1
Repeat steps 3-9 until the perpendicular shot from P1 fails to intersect any ridges.
# define the distance between transects
step = 100

# With a vertex spacing of ~1m, take every `step`th vertex along the centerline
starts = np.asarray(cl.geometry[0].xy).T[::step]

# Generate transects
transects = create_transects(
    cl, smooth_ridges, step, SHOOT_DISTANCE, SEARCH_DISTANCE, DEV_FROM_90
)

# Save transects to disk
transect_path = output_dir / "LBR_025_transects.geojson"
transects.to_file(transect_path, driver="GeoJSON", index=True)

# Plot migration pathways alongside ridges and centerlines
fig, ax = plt.subplots(1, 1, figsize=(7, 4.5))

cl.plot(color="k", lw=2, ax=ax, zorder=0, label="Centerline")
smooth_ridges.plot(color="k", ls=":", ax=ax, zorder=1, label="Ridges")
transects.plot(color="r", ax=ax, zorder=2, label="Migration Pathways")
plt.scatter(starts[:, ::2], starts[:, 1::2], color="r", zorder=3)

ax.legend()
ax.set_axis_off()

plt.tight_layout()
Move on to Calculate Ridge Metrics
All vector datasets needed for ScrollStats are now created. Calculate Ridge Metrics will contain the example code to calculate ridge metrics from the ridges generated here and the ridge area raster created in Delineate Ridge Areas